
Firstly, an apology. This blog demonstrating the demo was supposed to be published a month or so ago, but things just kept getting delayed. Nonetheless, here were are!
As looking into the architectural diagrams in the previous post, let's divide the usage by three different personas:
- Provider - Someone who is providing protected content
- User - Consumer of the content via a Browser
- Insulate - The core of this project managing the flow
Let's break it into smaller segments to show different steps involved with the project and which user persona it targetted to.
Step A: Provider - Register with Insulate
curl --request POST 'https://project-insulate.herokuapp.com/api/provider' \
     --data-urlencode 'email=changeme@test.com'
Running this command will give a client_id and a client_secret which should be stored by the provider. client_id is a public value, but client_secret should be, well, kept as a secret!
Step B: Provider - Update meta tags on their website
On the UI side, ensure that you have the following two meta tags:
-
monetization: Put your wallet pointer id -
insulate-id: Put theclient_idcollected in Step A
Here's a demo file, and would like like this:
<head>
    <meta name="monetization" content="$ilp.uphold.com/H3NqAwkm9g3W">
    <meta name="insulate-id" content="16ebdcd5b3067e95fe7146e5b15052dd27618615fb2296b5">
</head>
We will come back to make a minor update to this file but in a later step.
Step C: User - Install the extension
The user (on a Chrome browser) needs to have the Project Insulate extension installed. It is available on Chrome Web Store.
Once the user installs it, it needs to sign in with Coil.
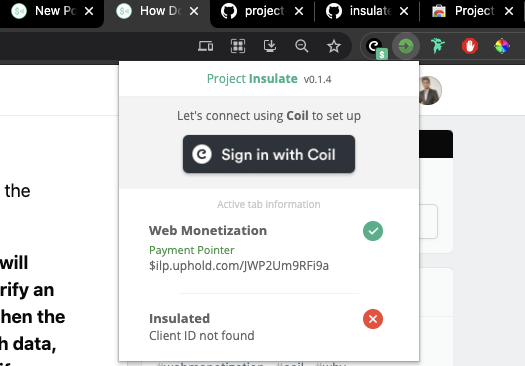
And that's it for the user! Quick and easy, hopefully, something like this can be directly integrated into the Coil extension itself.
Step D: Provider - Verify the user view
If your website has both a valid monetization and insulate-id, the extension will automatically talk to the Insulate backend, so some maaagiiiccc (details in the previous techie post), and return an insulateTransactionId.
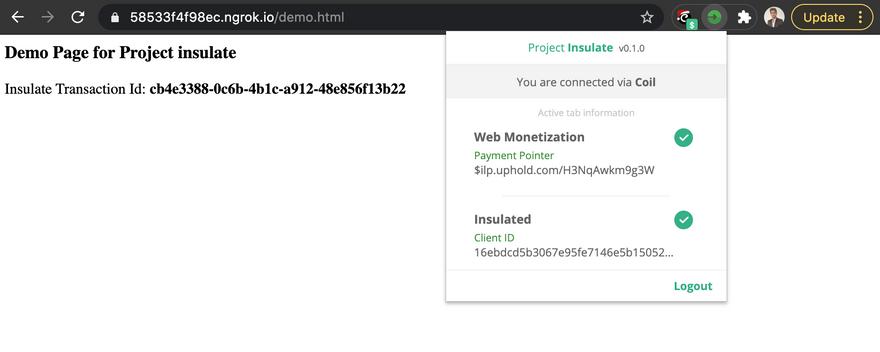
The provider needs to capture this insulateTransactionId, and send it back to its backend where it can be verified.
Let's go back to the HTML file and add a listener:
window.addEventListener("message", function (event) {
        // We only accept messages from ourselves
        if (event.source != window)
            return;

        if (event.data.type && (event.data.type == "insulateTransactionId")) {
            let transactionId = event.data.text;

            // *** Make call to backend (provider) and send transactionId ***

        }
    }, false)
Again, the demo file has the above as an example.
Step E: Provider - Validate the insulateTransactionId
Now, once the UI gets the insulateTransactionId, it can be passed to the backend, which can use the client_secret received in Step A to confirm with Insulate about its validity.
curl --request POST 'https://project-insulate.herokuapp.com/api/block/verify' \
--header 'Content-Type: application/json' \
--data-raw '{
    "paymentPointer": "$ilp.uphold.com/H3NqAwkm9g3W",
    "clientSecret": "10cc6c3ea96bb3ab525c61af71dfa1e58d11159cfd5de3d6",
    "transactionId": "c3798dce-4893-497e-8b80-f48a52896eda"
}'
Here ensure the paymentPointer matches the one on your website and pass in the insulateTransactionId as the transactionId in the POST call.
Insulate backend will return you the following fields:
-
recordFound: If the record with the provided transactionId was registered within last 5 minutes, it will returntrue, elsefalse. -
visitedBefore: If (1) istrue, this will returntrueif a previous call was made to check its validity. -
oldRecordExisted: If (1) isfalse, this will returntrueif the record ever existed before.
Step F: Provider - Return the protected content
Depending on the values returned in Step E, the provider can release its protected content and share it back with the user now safely, and get paid via the Coil extension as it would before.
Voila!
There's more information available on the GitHub Repos:
Project Insulate Chrome Extension
Project Insulate aims to protect an API call used by a provider to send data when dependent on Web Monetization. Currently, the only way to fetch data is to keep the endpoint public if no paid-user login is present on the UI. Also, this project ensures no user PPI is shared with the provider to maintain the privacy component of the Web Monetization technology.
Follow project at: Web Monetization Community: Project Insulate
Published at Chrome Web Store
How does it work?
Case 1: Provider (any one providing data and trying to secure API call)
Firstly, you would need to register with Project Insulate using the instructions given in API README to get a clientId and clientSecret.
Once register, as you can see in the demo.html page, provider needs to add a meta tag with name as insulate-id and value being the clientId.
Everytime…
 project-insulate
/
insulate-api
project-insulate
/
insulate-api
This repository will serve as the backend for Grant for the Web (GftW) project: Project Insulate
Project Insulate API
Project Insulate aims to protect an API call used by a provider to send data when dependent on Web Monetization. Currently, the only way to fetch data is to keep the endpoint public if no paid-user login is present on the UI. Also, this project ensures no user PPI is shared with the provider to maintain the privacy component of the Web Monetization technology.
Deployment
Heroku pipeline is set to auto deploy master branch currently.
Main functionality for Providers
-
Registration: This will return you
client_idandclient_secret
curl --request POST 'https://project-insulate.herokuapp.com/api/provider' \
    --data-urlencode 'email=hello@test.com'
- Verify transaction: This will return you if the transaction was successfully added in last 5 minutes, if so, has it been used (by any previous verification call).
curl --request POST 'https://project-insulate.herokuapp.com/api/block/verify' \
--header 'Content-Type: application/json' \
--data-raw '{
    "paymentPointer": "$ilp.uphold.com/H3NqAwkm9g3W",
    "clientSecret": "10cc6c3ea96bb3ab525c61af71dfa1e58d11159cfd5de3d6",
    "transactionId": "c3798dce-4893-497e-8b80-f48a52896eda"
}'
API Documentation
Architectural Diagram
Current system…
Feel free to ping me if you have any doubts or suggestions to make the documentation, code, or series overall better. Cheers!

Top comments (0)